Boost Your Wi-Fi with Quick Linksys Extender Setup
Quick Setup Guide for Linksys Extender.Linksys.Com & App
Live Chat
Linksys Range Extender RE9000 Setup
Learn how to connect Linksys Extender to WiFi Model RE9000, and more.
Tri-band networking devices have taken the networking sector by storm. The ability to direct connected devices to the extended WiFi band for the best performance is what attracts more and more users towards these devices. The Linksys RE9000 tri-band range extender is one among the league. If you have bought one of these excellent devices recently, learning the steps to Linksys RE9000 extender setup can help secure access to the internet around your home easily. Find complete information on Linksys RE9000 setup and the related troubleshooting steps you can follow to keep it running at all times.
Linksys WiFi Extender RE9000 Setup- What’s Needed?
Before you start setting up your Linksys RE9000 extender with your home network, you will need to arrange for some details like the main router’s network credentials. This is essential as you will be connecting to the router network to extend it.
Secondly, you’ll need an active internet connection. Ensure that the internet service is activated so you don’t fall into trouble during the network configuration phase.
Next, also ensure that you have the extender’s admin credentials like the default username and password details to access the main setup wizard. You can find these details on the product label or in the user manual that arrives in the product package.
For your reference, the default details for the extender are:
Default Web Address:
Default IP Address:
192.168.1.1
Linksys RE9000 Default Password:
admin
Default Username:
admin
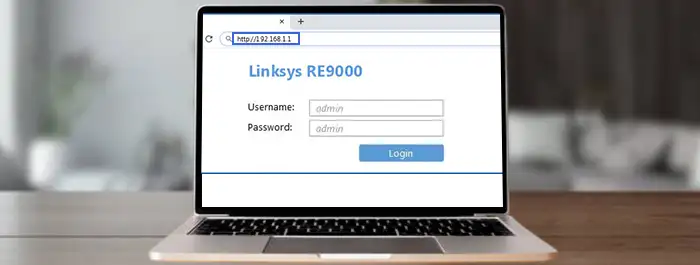
If these default credentials don’t work, you can check for the same on the product manual or on the product label pasted to the bottom panel of the extender device.
Now that you have the details with you, you can proceed with the setup and installation process easily.
Linksys RE9000 Extender Setup Methods
The Linksys RE9000 can be set up for use as a range extender and as an access point as well. When set up in the range extender mode, the device will repeat the existing WiFi signals over to the area further. When configured as an access point, it will create new WiFi hotspots. Both cases will require a router with a working internet connection.
Linksys RE9000 Setup Access Point
Before you start setting up your extender, ensure that the main router you are going to connect to has a working internet connection. Also check if you have a cable that’s long enough to connect the router to the range extender.
- Switch on your Linksys RE9000 and wait till the power light indicator turns to solid green from blinking orange.
- Use a smartphone or a computer to locate and connect to the extender network. You'll find the same in the available networks list. Select the same once you see it and click on the Connect button. Once your computer is connected to the network, launch a web browser and access the default web address.
- Type the default web address http://extender.linksys.com in the address bar to begin with the setup. You will be redirected to the Linksys RE9000 setup page.
- From the setup wizard, select ‘As a wired range extender(Access Point)’ when prompted. Now, follow the on-screen instructions to create the network name and password details for the access point.
- Once set up, you can connect your WiFi devices to the extender network you just set up. Select the extended network on your device’s WiFi manager. You can identify the extender network with the suffix ‘_Ext’ to the end of the network name.
- If the MAC filtering feature on your router is turned on, you will need to enter the MAC address of the Linksys Extender Setup RE9000 into the list of the Allowed Devices. This will allow the extender to connect to the router network easily and extend it further.
- Once the extender is connected to the maine outer network, all the devices connected to the extender will have access to the internet automatically.
Setup As a Range Extender
- To configure your Linksys extender in the Range Extender Mode, you’ll need to plug it at the location which is somewhere in between the router and the area without the WiFi connection.
- You can check if the location is actually conducive to network reception and transmission using your smartphone or laptop. Once the location is finalized, plug in the extender to the power outlet and turn on the power from the mains.
- Allow the extender to power up and the LEDs on the device to start blinking in orange. This might take up to a minute or so.
- Connect the Linksys E9000 setup to your computer using a wireless or a wired connection.
- After it is connected, use the default web address extender.linksys.com or the IP address 192.168.1.1 to access the web setup wizard and complete the setup process.
- Select the ‘As a wireless range extender’ option from the setup wizard. Next the extender will ask you to choose the wireless router network you are looking to connect to.
Connecting to the main router network
- A list of the available wireless networks will be shown on the screen. Select the network details of your main router and connect to it.
- Type in the password for this network when requested and click on the Next button.
- From the ‘Your Wireless Network’ window, configure the 2.4GHz and 5GHz network details like the SSID and the password for the same.
- Once this configuration is done, the set up wizard will help you find the perfect location for your extender installation using the Spot Finder app.
- After the location is finalized, the range extender will ask to be secured by customizing the range extender’s admin details. Type in the details you’d like to keep and then register your product from the next window.
- Once these steps are complete, you will be done and the extender setup process will conclude.
- You can connect your range extender to the newly extended network now.
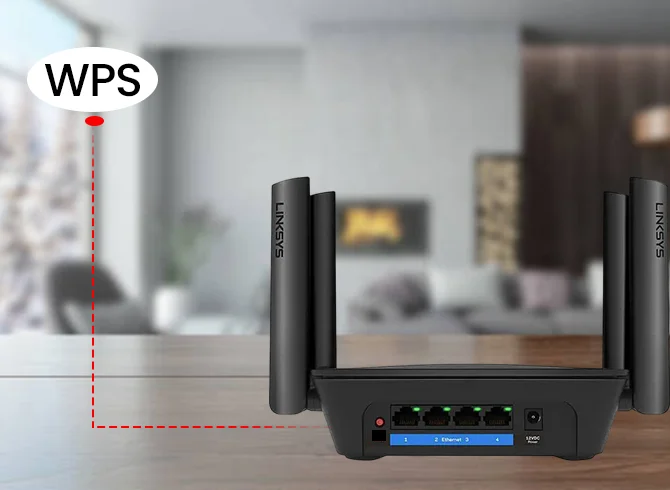
Linksys RE9000 extender setup using WPS Method
If your main router supports connection by WPS(WiFi protected Setup), you can use it to connect to its network. You can find the WPS button on the side panel of your range extender device. Here are some steps you can follow to proceed with the Linksys RE9000 Setup using the WPS method:
- Plug your range extender into the power outlet at your home. This location should be in close proximity to the router so the network strength is strong. Allow some time for the extender to boot up and proceed with the setup.
- Once you see the LED light color on the extender turn orange, press the WPS button on the router.
- Now, within the next two minutes, press the WPS button on your range extender as well. The WPS light will light up and the light on the top of the extender will start to blink in green.
- Watch the light on the top of the extender to verify if the connection was successful. This can be ensured using the solid green color on the LED.
- If you see the LED blink in orange, the connection likely failed and you’ll need to repeat the steps to extend the network again.
- Try moving your range extender closer to the location that your main router is installed at. This will ensure that the extender can connect to the router’s network safely and the strength is good.
You can now connect your wireless devices to the new extended network. Use the WiFi credentials which you find on the product label to proceed with internet access. The Linksys range extender RE9000 setup process is now complete.
Troubleshoot Linksys RE9000 Issues Effectively
While you are trying to configure the network settings on your Linksys extender device, you might also come across issues that might hinder your chances to connect to the internet and set up an internet connection.
I can't connect to Linksys RE9000 Extender Network
Check if the power indicator light on the front panel of Linksys RE9000 blinks in orange color. if it’s not you’ll need to check the cable connections between devices. Furthermore, you can follow the troubleshooting steps as mentioned.
- If you still can’t view the network setup, move your device closer to the range extender.
- Wait for the indicator light to start blinking in orange and then refresh the Wi-Fi list. When you see the SSID, click on the name and then on the Connect button to connect to the network. The Linksys RE9000 extender setup will connect to the router network and the LED color will change to green.
Linksys RE9000 Extender login not working
If the extender login page is not working, it is likely that you aren’t using the correct login address. Check if you are using the right login IP or web address to access the login page. The correct web address is extender.linksys.com RE9000. If you wish to use the IP address it is 192.168.1.1. Also, while using these addresses, ensure that you type in the same in the URL bar and not in the search bar.
Secondly, you can check if the devices are connected to each other using the LAN cable. Inspect the cable connections and see if they are connected securely to the LAN ports on the devices. If not, reconnect them. If the cables are damaged, replace them with CAT5E specification LAN cables and try to access the extender login page again.
Once you have done that, you’ll be able to access the Linksys RE9000 extended login page on your web browser. In case, you are connected using a wireless connection, ensure that you connect to the correct device network. Move closer to the extender to ensure good network coverage throughout the setup and login process.
Intermittent Connection Problems With Linksys RE9000
If the network connection is not regular and breaks often, you may need to keep the extender midway between the router and the area between the location where you are looking to access the WiFi at. Ensure that the range extender has at least 50% of the router’s WiFi signal strength to access. If you check and find the signal strength to be low, it is prudent to move closer to the router for a better connection.
To check the signal strength for individual devices connected to the network, you can go to Status and then click on the Wireless Clients Table. The table will reflect all the details about the connected devices and the signal strength they are receiving from the extender. If any of your devices indicate low strength, you can move it closer to the extender and you’ll start experiencing better coverage and lesser connectivity issues.
Need more help with Linksys WiFi Extender RE9000 Setup Process?
Connect with the team for quick resolution on any issues you might face, today!
Easy FAQ
Quick Answers
How do I complete the Linksys RE9000 firmware update process?
The device may restart several times during the firmware update process. Make sure that you don’t restart or unplug it from the power outlet. Once the device reboots, the update process will be complete.
What are the steps to Linksys E9000 factory reset?
- Locate the reset button on your Linksys RE9000 extender setup. You will find it on the bottom of the device.
- Use a thin object like a pin or a paperclip to press and hold the reset button for about 30 seconds. Once the LEDs on the extender device begin to blink, release the button and allow the device to reset itself.
- The device will reboot itself and the reset process will conclude. Once the process is done, you’ll need to reconfigure the device’s network settings to be able to access the internet using the same.