Boost Your Wi-Fi with Quick Linksys Extender Setup
Quick Setup Guide for Linksys Extender.Linksys.Com & App
Live Chat
Detailed Linksys Extender RE7000 Setup Guide | Updated for 2026
Learn how to setup Linksys extender RE7000 for seamless internet access on the go.
Linksys is one of those venerable companies people admire for releasing networking products that actually perform. Among the long list of networking devices they offer is the Linksys WiFi Extender RE7000. If you have recently bought/upgraded to this device, knowing how to set things up and complete the Linksys RE7000 setup becomes essential. This website will walk you through how to complete the Linksys RE7000 set up process in simple steps.
Linksys WiFi Extender RE7000 Setup | Things to Know
The Linksys RE7000 Max-Stream AC1900+ Wi-Fi range extender uses advanced technology to push your router’s network farther into the corners of your home. Through Linksys extender RE7000 setup, you can harness its capabilities at a new level.
The Linksys RE7000 wifi extender comes with a quick and efficient setup process. It can be set up in two ways: as an access point and as a range extender. Go through this page to learn the exact steps for the same.
Some Features Worth Highlighting
-
Model Description:
RE7000 Max-Stream™ AC1900+ MU-MIMO WiFi Extender -
Series:
Max Stream RE7000-AMZ -
Wireless Security:
Wi-Fi Protected Access™ 2 (WPA2), Wi-Fi Protected Access™ (WPA), and WEP -
Cabling Type:
CAT 5E -
Ports:
Gigabit Ethernet, Audio, and Power
Dual-Band Support
Once the Linksys Range Extender setup completes, you will be able to understand the power of the dual-band nature of the Range Extenders; this feature ensures maximum speed and extensive coverage. The 2.4GHz band on your Linksys Extender RE7000 setup is able to reach into the far corners of your house and is able to eliminate the dead zones while the 5GHz band ensures a strong connection and transfers data at unimaginable speeds in a network. It is also known that the Dual-Band devices minimize data congestion which is another important issue faced by a lot of networks.
Beautiful Design
The look of the device matters a lot in today’s world. Not more than being a powerful device, the Linksys RE7000 set up is also a style statement. This means the devices need to look at the part too. This is achieved with the beautiful edgy look of the devices which are made by the Linksys Corporation. The entire design is applied keeping in mind the iconic and futuristic appeal of the Linksys Corporation itself.
Audio device connectivity
Music has become so much important in today’s time that I can’t even explain. The first thing in fact that you’ll do after the Linksys WiFi extender Re7000 setup process completes would be to play the victory music. Let Linksys Range Extenders help you with it too. The available audio 3.5mm jack in many Linksys Range Extenders will let you play music wirelessly. Just connect your speakers in the provided audio jack and you can play any and all music via your phone which would be streamed wirelessly across your now powerful wireless network.
Spot Finder Technology
We understand that finding the perfect place for your Range Extender devices is a little painful. The constant moving back and forth around the house is a little exhausting. The alternate is to digitally spot this perfect location which you can do using the Spot Finder technology which will help you swiftly complete the Linksys WiFi Extender RE7000 setup process. This also lets the user enjoy a rather futuristic approach on how to install a new device as soon the world would be digitized; this could be the first step towards it.
Linksys Extender RE7000 Setup Process | Things You’ll Require
- Your existing router or access point
- A password and SSID of the router's main network
- Ethernet cable(s) if you want to use the extender in Access Point Mode
- A smartphone or computer
- A supported web browser like IE Ver 8 or higher, Safari Ver 5.1 or higher, Google Chrome Version 25.0 and higher, or Mozilla Ver 20 and higher.
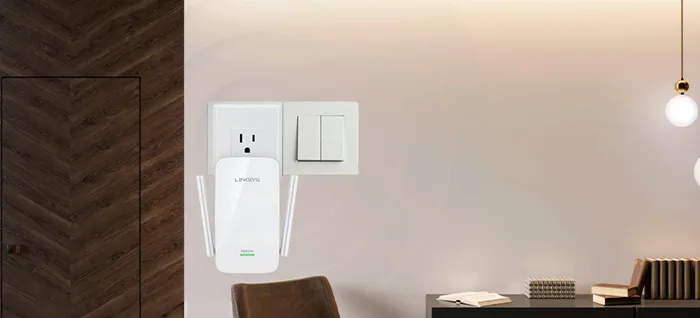
Before you begin installing your Linksys re7000 setup, it’s important to remember that you’ll have to decide on the proper place for the extender device. This is done by using the lights on the front of the device that extends. Here’s more information on the LED lights:
- The Amber hue of the LED signifies that the strength of your network is not strong enough and you'll need to move your unit closer to your router.
- The blinking Amber/Orange/Yellow color on the LED signifies that the range extender is not connected to the internet.
- The green light that appears on the Ethernet LED means that the strength of the network is very high. The device connected to the internet and is active. The light blinking will mean that the extender is sending/receiving data.
- Based on the color codes, you'll be able to determine the best location to place your device. Once you have found the same, you can proceed with the Linksys WiFi Extender RE7000 Setup easily.
Linksys RE7000 Setup Access Point Mode
Your Linksys Extender RE7000 can be configured to work in Access Point mode. This mode lets your extender expand your home WiFi network by connecting to your router or a switch using an ethernet cable. This allows for minimal loss of signal performance and avoid issues like dropping connection or interference from other signal emitting devices. For better WiFi speeds, you can choose to setup your RE7000 extender in Access Point mode. Here are some steps you can follow:
- Plug your range extender into a power outlet. Wait until the light on the LED starts to blink in Amber color.
- Now, when the device is ready, connect a LAN cable from the router’s LAN port to the LAN port on your range extender. Based on what model of extender you are using, you might need to wait for the light to turn green before you proceed to the next step.
- After the extender is ready for the setup, connect a computer or a mobile device to the extender network. For wired connections, connect the computer to the extender using a LAN cable. For a wireless connection, connect to the network using the WiFi connection.
Note: You can find the WiFi MAC address of your range extender in the web interface. To locate the same, go to the Status menu and then select WLAN Statistics and then head to the Extender MAC address.
How to login Linksys RE7000 extender?
- Once your computer is connected to the extender’s network, open a web browser and then type in the default web address http://extender.linksys.com RE7000 in the URL bar. Press enter and it will redirect you to the default Linksys extender login page.
- You can also access the same using the default IP address 192.168.1.1. If the IP address doesn’t help, you can look up the range extender’s IP address in the router’s DHCP client table.
If you have already setup the extender, the setup wizard will ask for the Linksys RE7000 default password details. You can type in these credentials to login and configure your range extender settings further. For new extenders, you can proceed with the following steps:
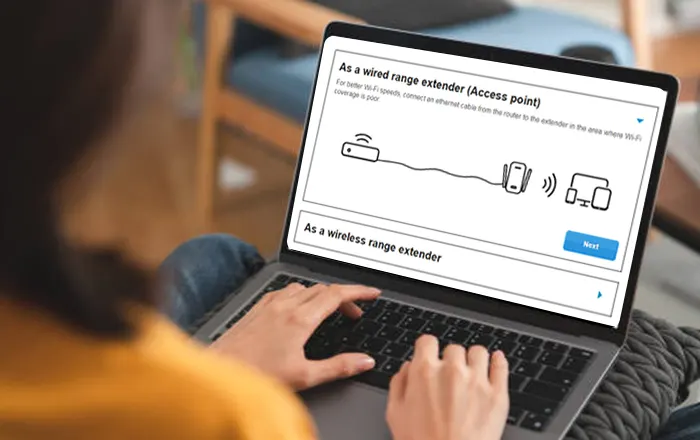
- You will now see the Linksys RE7000 Setup Page. From the main screen, click on the Start Setup process.
- Click on the next button under the ‘As a wired range extender(Access Point)’ menu. If you haven’t connected an ethernet cable from the extender to the router, it will ask you to connect the same. This is important when you are looking to configure your extender as an Access Point.
- From the setup wizard, create unique WiFi names that the range extender will be broadcasting its network with. You can create two different WiFi names for the 2.4GHz and the 5GHz network bands or use the same one as on the product label. Create a WiFi password to secure the network and click on the Next button.
- Next, create an admin password for the range extender and then click on the Save button. You can also add a password hint.
Your range extender is now set up in Access Point Mode and you can start using the internet easily.
Linksys RE7000 Setup in Range Extender Mode
To connect and configure your Linksys RE7000 Set up in range extender mode, the initial installation process will remain the same. Once you have accessed the Linksys RE7000 setup page, you can proceed with the following steps:
- From the Linksys extender RE7000 setup wizard, click on the ‘As a wireless range extender’ options and then click on the Next button.
- From the next screen, choose the network from your main router which you want to extend. If you are using a dual-band WiFi router, wait until you see the entry with both network bands mentioned. Once visible, click on the Next button.
- Even if you don’t see both entries, refresh the network page and then proceed. If the dual band entry still isn’t visible, proceed with the setup normally. You can set up and configure the 5GHz band later in the Basic Settings section of the setup wizard.
- When prompted to enter the router network password, type in the same using the correct sequence of the letters/characters/symbols that make the password. Once entered, click on the Next button.
- From the ‘Your Extended network’ section, configure the extender network. Customise the details like the network name and linksys re7000 setup password for each of the bands and then click on the Next button again. The extended network will have the suffix ‘_EXT’ added to the network name.
- The Spot Finder page will now appear on the screen. This will help you find the perfect location where you can install your extender at. This page will tell you if the extender is too close to the router, or if it is too far from the router and then help you find the ideal location.
Concluding the Setup Process
- Once you have found the same, you can now create an admin password to access the range extender’s settings wizard. Once done, click on the Next button.
- As the last step of the setup process, you can register your product on the new screen. Once done, click on the Next button.
Your Linksys RE7000 extender is now set up and you can print the summary page for future reference. Once your range extender has a solid blue light emanating from it, you can be sure that the extender is connected to the internet. To access the range extender setup wizard in the future, you can connect to its network first and then use the extender.linksys.com RE7000 setup page. Your Linksys RE7000 setup is now configured completely.
Linksys RE7000 Setup WPS Method
WPS or Wi-Fi Protected Setup is among the easiest methods to connect your extender to the main router device. It uses a wireless technology to sync both devices without the use of a password or following a complex and lengthy setup process. However, your router and the extender, both should support connection over WPS functionality. To complete the Linksys extender RE7000 setup using WPS, here are some steps you can follow:
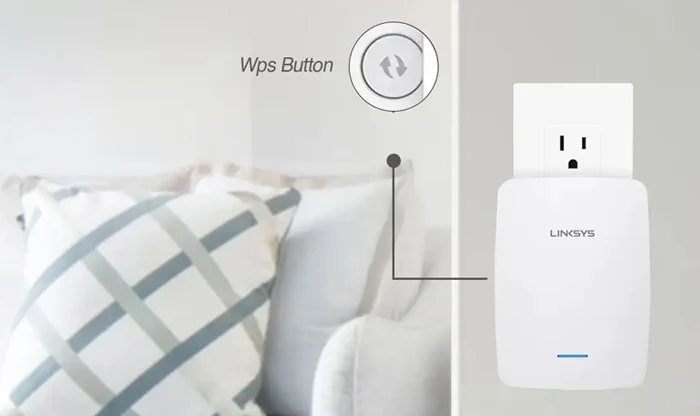
- Locate the WPS button on your router and the extender.
- Press the WPS button on your extender until the WPS LED lights up and starts to blink.
- Now, go to your Linksys re7000 setup and press the WPS button there as well. The time for this is 2 minutes.
- Once you have done so, the devices will connect to each other and a connection will be signalled by the WPS LED going solid. Once it does, you can start using the internet on your connected devices.
Need More Help with Linksys Extender RE7000 Setup?
Connect with the experts in the setup process and start using fast internet today!
Easy FAQ
Quick Answers
What are the steps for Linksys re7000 firmware update?
- Use the Linksys re7000 Login page to access the extender setup wizard.
- From the Linksys re7000 setup page, click on the Firmware Upgrade button under the Administration section.
- The extender setup wizard will automatically detect if there’s a new firmware version available. If yes, you’ll see the new version listed and you can click on the ‘Update Now’ button to start with the process.
- If you want to manually upload a file, you can click on Select a file option and select the firmware file you may have downloaded.
- Once the file is uploaded, click on the Save button and then Start Upgrade button.
- Wait for the update process to finish. Do not power off or restart the extender device while the update is in process.